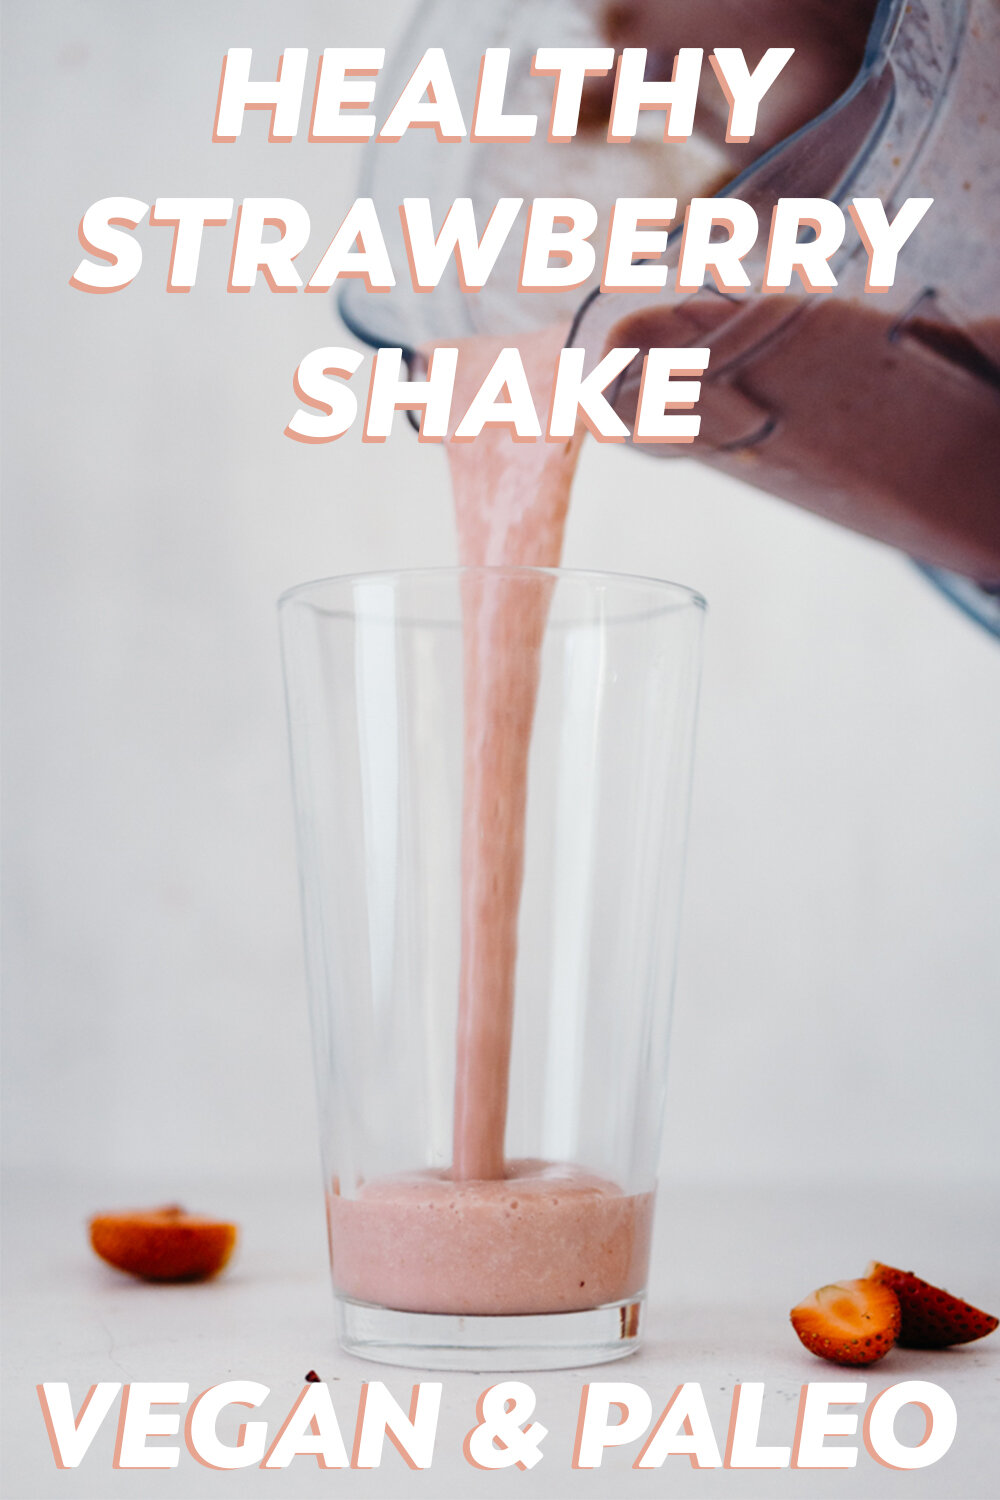
Healthy Strawberry Shake // Vegan & Paleo

There’s nothing like strawberries in the summertime! Whether you're covering them in sugar, freezing them in Popsicle molds, or picking them straight from the plant, they are the perfect summer treat!

Well, I was feeling the summer heat here in FL for the last week at we hit the mid-90s, leading me into a desperate attempt to make something refreshing and simple! I looked in my freezer and there it was, a forgotten bag of frozen strawberries just WAITING to be made into something refreshing.

I grabbed the bag and then checked the content of my fridge, almond milk, coconut cream, and dairy-free yogurt all stared back at me and I knew it was time to make a healthy Strawberry milkshake!

This shake is not meant to overload your taste buds with the sugary version of a strawberry, but offer a taste that is both sweet and slightly sour at the same time, making for the perfect summer strawberry!

using unsweetened yogurt is how you get this effect, but if all you have is sweetened yogurt omit the maple syrup. Give it a taste test once blended and dd in the agave if you want to!

If you are like my husband and enjoy sour strawberries omit the maple syrup and sweetened yogurt all together!

LL 107-12-2.jpg

Prep Time: 10 Minutes

Ingredients

  • 1 & 1/4th cup frozen strawberries

  • 1/4th cup almond milk

  • 1/2 cup almond milk yogurt

  • 1/4th cup coconut cream

  • 2 Tbsp. Maple Syrup

Instructions

It’s simple! Add in all of the ingredients into a blender and blend until you have a smooth consistency.

If need be add in a little extra almond milk, but just keep in mind this will alter the taste a bit.

Pour, sip and enjoy!

Cosmic Brownies // Gluten Free & Vegan

One fine afternoon my friend Natalie from the blog Feasting on Fruit and I were discussing what treasures we would make next. Our obsession with pumpkin for the season had yet to begin so we began to brainstorm what to make until then.

When we come up with recipes they have to be Daniel approved because if we can make a baking traditionalist happy with something baked that’s gluten-free and vegan, we can make anyone happy! We also take every opportunity to make recipes that give us some glam drizzle shots!

LL 107-1-2.jpg

We landed on something nostalgic, chocolaty, and irresistibly good! You probably guessed from the title of course, but we landed on making Cosmic Brownies, and we were determined to make them even better than the original. I know that’s saying a lot especially when we are making them without flour, butter, or eggs…

Well, folks, this one here is a winner if I have ever seen (or eaten) one! The fudgy brownie and decadent chocolate ganache will without a doubt bring up your dessert game while simultaneously bring you back to your childhood days, eating Little Debbie snacks on the back porch with your friends.

We made this recipe simple so that everyone can have a chance to make and enjoy them! We also kept in mind to make these vegan, gluten-free, & paleo so that more than just one group of people can enjoy them! Let us know how you enjoy the brownies, and in the meantime don’t forget to check out Daniel Peacocke on YouTube and Natalie on her website Feasting on Fruit!

Now without any further delay here is the recipe!

Brownies

  • 2 flax eggs (2 tbsp ground flax + 6 tbsp warm water)

  • 3/4 cup (185g) runny nut/seed butter

  • 1/4 cup (50g) coconut oil*

  • 1/2 cup (75g) coconut sugar

  • 1 tsp vanilla extract

  • 3/4 cup (70g) cacao powder

  • 1/2 tsp baking soda

  • 1/4 tsp salt

Ganache

  • 1 cup (160g) chocolate chips

  • 1/3 cup coconut milk

  • Colorful sprinkles for topping**

Instructions

  • Preheat the oven to 350F

  • Whisk together the nut/seed butter, coconut sugar, prepared flax eggs, and vanilla.

  • Stir in the cacao powder, baking soda, and salt to form a thick batter. If batter seems too dry add 1/4 cup coconut oil or nondairy milk.

  • Spread into a greased loaf pan. Bake for 20-25 minutes at 350ºF.

  • Cool completely (or chill to speed it up) before frosting

  • For the ganache, melt the chocolate chips with the coconut milk. Stir until smooth pour/spread on top of cooled brownies.

  • Top with sprinkles. Chill until the ganache is set.

  • Slice and enjoy!!

Notes

*You can use non-dairy milk instead of coconut oil for an oil-free option, but the brownies will be drier.

** For an all-natural revision check out Feasting on Fruit for a homemade sprinkles recipe!

COSMIC BROWNIES PIN.jpg

Banana Bread Smoothie

Nothing beats waking up to banana bread during the star at home orders…thankfully you can now enjoy banana bread in several forms thanks to this rending food item right now. For me I a big fan of smoothies in the morning, so when everyone was baking away, I remembered a recipe that I had come up with last year and totally forgot about! Let me explain…

Last year I spent some time in South Africa to see family and there is this smoothie place that is over the moon delicious! One of my favorite smoothies I had there was one that tasted exactly like banana bread! I figured that since I am in America now, and couldn’t get my hands on a smoothie made to perfection, I would have to make one at home!

When you freeze your bananas they should be ripe, none of this green banana business. Remember you want this to taste like banana bread & when it comes to banana bread spots = deliciousness! Just make sure they aren’t at that stage of the peel looking completely brown, that flavor is a little too intense for this smoothie…

If you would like to make this a vegan smoothie feel free to omit the collagen and instead replace it with vegan protein powder. Just keep in mind that this will change the taste and texture a bit. Try to stick with unflavored or vanilla protein powder.

Ingredients

  • 1 cup Almond Milk

  • 1 Tbsp Tahini**

  • 1 Tbsp Cacao nibs

  • 1 Tsp Cinnamon

  • 1 Frozen banana

  • 3 to 5 ice cubes

  • 1 scoop Collagen

Directions

  • combine all the ingredients into your blender, making sure to pour in your almond milk first! This helps to ensure that your dry ingredients don’t get stuck at the bottom of the blender.

  • Sip and enjoy it!

    **If you don’t have Tahini on hand, the next best thing is cashew butter or 2tbs soaked Cashews.

banana bread pin.jpg

No-Bake Coconut Cookie Bars

Chocolate is kinda my thing if you haven’t noticed from the presence of chocolate in my recipes. So when I am thinking of a new recipe, that’s usually where I start! Then I think to myself what goes best with chocolate? Well today I had a huge bag of coconut in my cupboard that was just ASKING to be made into a sweet treat!

Now in order for my sweet treats to be accepted into the realm of Sonya’s Open Cupboard they have to be tested and approved by both my nieces, nephews and my husband. All who are equally picky…When I presented these No-Bake Coconut Bars it was a success!

The kids loved them and so did Daniel and my sister, and me, and…well we ate them all so that was as many people I had try them that day!

My favorite part about these bars is that they are a no-bake recipe, that is super easy to make, especially if you are home with little ones! I take care of my nieces and nephews a lot who are all under the age of 10. Keeping things creative with them is super important to me so whenever there is a simple recipe to make with them it’s so much more fun!

The Coconut Cookie layer is great because you get to use your (washed) hands to mix and place in the pan which is great for stimulation!

For the Chocolate layer, you get to teach them about using a double boiler, and how easy it is for the chocolate to burn. This helps them learn precision and the importance of following directions! It also teaches me to be more patient and relaxed with them…so all around it’s a win-win!

LL 107-1.jpg

Coconut Cookie Layer

LL 107-5.jpg
  • 1 cup coconut flour

  • 2/3rd cup shredded coconut

  • 1/4th cup Agave

  • 1/4th cup hemp hearts

  • 1 tsp sea salt

  • 1/3rd cup full fat coconut milk

  • ½ cup sunflower butter

Chocolate Layer

  • 1 cup chocolate chips

  • 2 Tbsp coconut oil

Toppings (optional)

  • Toasted Coconut (see directions below)

Directions

Line an 8x8 Brownie pan with Parchment paper, making sure the paper covers the sides of the pan.

In a bowl whisk together the coconut flour, shredded coconut, hemp hearts & sea salt.

Add in the Coconut Milk, Agave, and Sunflower butter and mix until well combined, using your hands if need be!

Press the dough into the pan evenly, making sure to get the cookie base evenly into every corner!

Freeze the base for about 30 minutes.

While your base is in the freezer, combine your chocolate chips and coconut oil together and melt using a double boiler method. What I do is boil water and put it in a glass bowl, and then place the smaller glass bowl with the chocolate and coconut oil, into the hot water. Making sure the water doesn’t overflow into the small bowl. Make sure you are stirring the chocolate and coconut oil together. Feel free to replace the water with hot water halfway through if need be.

it should take about 5 to 10 minutes to melt the chocolate.

I have found that it is a super gentle way to melt the chocolate, and you end up with more control, especially since the amount of chocolate is small.

Once your chocolate is melted evenly pour evenly on top of the Coconut Cookie base and then place back into the freezer. If you want you can top with toasted coconut**!

After the cookie has been in the freezer for 30 minutes check to see if the chocolate has set. Once the chocolate has set take out, cut into squares and enjoy!

Toasted Coconut**

For the toasted coconut, all you have to do is preheat your oven to 350F

Put your desired amount of coconut on a baking sheet and bake it for about 8-10 minutes, making sure to keep an eye on it to make sure it doesn’t burn.

Let cool and use to top your No-Bake Coconut Cookie Bars!

Dairy Free Frozen Yogurt Bars

I don’t know about you, but today was one of those days where I just didn’t want to drive to the grocery store. YOu might ask “Sonya, isn’t that your job?” Well yes, it is my job to think up recipes, but the products, and then we’ll give you a new product, but who says you can’t get a little creative with what you have at home!
So today I bring you THE BEST frozen yogurt bars because the best things always happen when you are forced into being creative! lazy =’s success!…at least, some of the time.

LL 107-11.jpg

I made these thinking it would be a tested recipe, but once they came out of the freezer and saw that they were both beautiful and delicious, I knew there was no use tweaking the recipe.

I used WHole foods Dairy-free almond milk yogurt because it is one of the cheaper options out there, without having a million ingredients or hoards of sugar added! I will add the sugar on my own, thank you very much!

I also used a 60% dark chocolate bar which didn’t melt as well as the enjoy life chocolate chips, but I think worked better for the recipe anyway! Having the ribbons of thick chocolate and almond butter with the combination of the sweet/tart blackberries and the crunchy texture of the sunflower seeds were everyyythinggg. Not to mention the flavor combination of dark chocolate, almond butter and blackberries is an opportunity we are missing out on!

SO without further delay, let this ice-cream loving, frozen yogurt convert teach you how to make frozen yogurt!

LL 107-10.jpg

Makes: 9 Servings

Total TIme: 3 &1/2 - 5 & 1/2 hours

Assemble time: 30 minutes

Freeze time: 3 & 1/2 hours

Ingredients: 8

Ingredients

                Base

·         2 cups Dairy free plain yogurt

·         1/4th cup syrup or agave

·         1 tsp vanilla extract


Toppings

·         Blackberries

·         1/4th cup Dairy free chocolate

·         2 tbsp. coconut cream

·         1/4th cup almond butter

·         2 tbsp. sunflower seeds

Directions

Line an 8x8 baking pan with parchment paper so all the sides are covered as to prevent leaks, and set aside.

Combine the yogurt, syrup, and vanilla together and then pour into the lined pan. Drizzle in the almond butter and Berries and put in the freezer. This will allow your toppings to set a bit before adding more so they don’t all mix together.

Using the double boiler method, melt together the dark chocolate and coconut cream together until smooth. Take the pan out of the freezer and drizzle the chocolate sauce on top. Sprinkle with sunflower seeds and then freeze for at least 3 hours.

Take out of the freezer and enjoy immediately!

Don’t forget to pin it!

Oatmeal Cream Pies // Vegan & Gluten Free

Recently I have been re-discovering the idea that because I have the freedom to eat whatever I want as long as its gluten & dairy-free! SO My friend from Feasting on fruit, my husband and I have been discussing some of our favorite childhood treats! I brought up the memory of going to youth group and always being greeted with a Little Debbie oatmeal cream pie! Now the love of a dessert that is NOT chocolate means a lot coming from a girl who keeps a 5lb bag of cocoa powder on hand at all times…

We decided it would be beneficial to everyone to make an at-home recipe that was vegan, gluten-free, and well, delicious!

Ingredients

  • 1/2 cup almond butter

  • 1/4 cup coconut sugar

  • 1/4 cup maple syrup

  • 1 tbsp molasses

  • 1 tsp vanilla extract

  • 1/2 cup Gluten-free oats

  • 1/2 cup Almond Flour

  • 1/2 tsp baking soda

  • 1/4 tsp salt

  • 1 tsp cinnamon

  • 1/4 tsp ginger (optional)

  • Store-bought vegan vanilla frosting OR Natalie’s homemade frosting found here! https://www.feastingonfruit.com/vegan-gluten-free-carrot-cake/

Directions

Pre-heat the oven to 350F and Prep your baking sheet with parchment paper

Combine the almond butter, coconut sugar, molasses, maple syrup, and vanilla

Stir in the oats, almond flour, baking soda, salt, cinnamon, and ginger until a thick batter forms

roll into balls and press them onto your prepared baking sheet, slightly flattening them.

Bake for 10-12 minutes and then let cool.

Once cool and then apply the frosting to the bottom of one cookie, and then sandwich with another cookie!

Serve and enjoy!

Thanks again!

Love,

Sonya, Natalie, & Daniel!

CF1431AC-C233-4ECA-B1E2-24EEA09C9287.JPG